How to Secure AI Agents with HashiCorp Vault's New Agentic Identity Features
Introduction
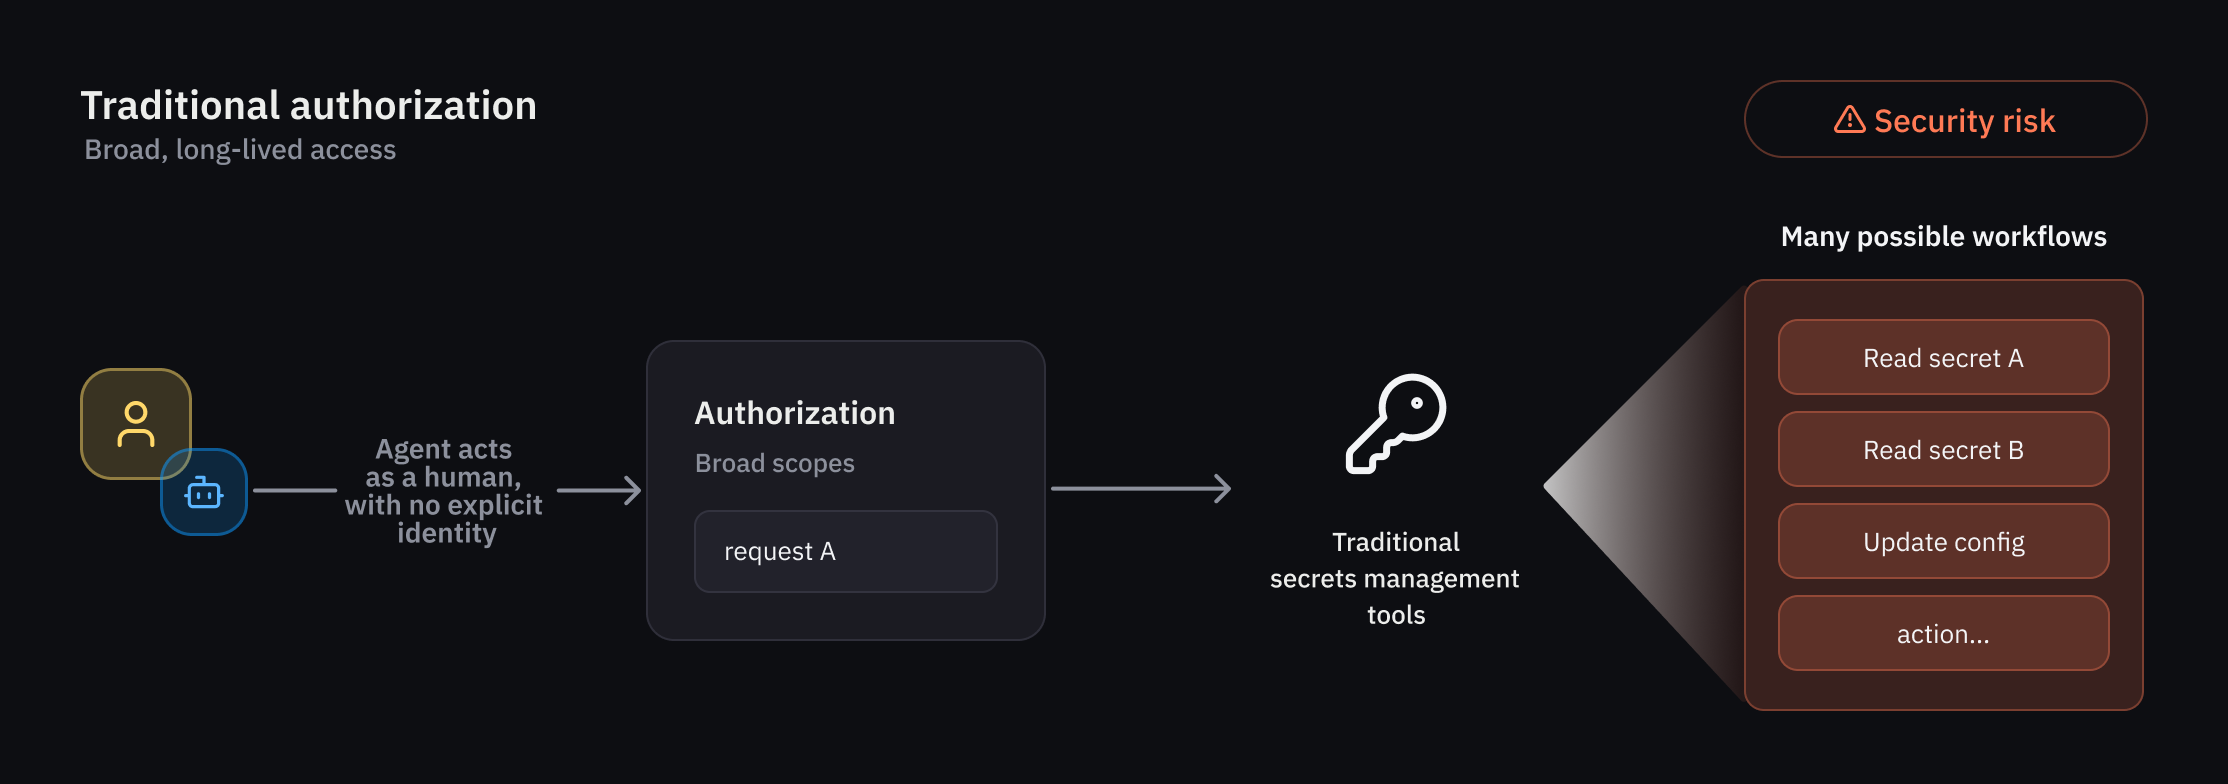
As organizations deploy AI agents that act autonomously and unpredictably, traditional IAM falls short. HashiCorp Vault now offers native support for agentic identities—a dedicated framework to register, authorize, and audit AI agents. This guide walks you through setting up these capabilities to enforce guardrails, grant temporary scoped access, and maintain clear attribution. Whether you're an early access participant or planning for the public beta, follow these steps to securely integrate AI agents into your Vault environment.
What You Need
- HashiCorp Vault instance (version supporting agentic identities—early access or later public beta)
- Administrator access to Vault (to configure policies and registry)
- AI agent service accounts or application IDs you plan to register
- Human user delegation workflows (if using on-behalf-of patterns)
- Basic understanding of Vault policies, tokens, and audit logs
Step 1: Register Your AI Agents in the Agent Registry
The agent registry is a new primitive that separates agent identities from human and traditional non-human identities (NHIs). Start by registering each agent with a unique identifier and metadata.
- Access the Vault UI or CLI as an administrator with appropriate permissions.
- Navigate to the Agent Registry section (available under Identity in the UI, or via the
vault write identity/agentAPI). - For each agent, provide a name, description, and any tags (e.g., environment, role).
- Optionally, link the agent to a human user for delegation flows—this enables on-behalf-of (OBO) tracking.
- Save the registration. Vault generates an internal agent ID used in policies and logs.
Why This Matters
Separate registration ensures that agent actions are explicitly attributed, not confused with human users. This is the foundation for granular authorization and auditability.
Step 2: Define Granular Identity-Based Policies for Agents
Since agents behave non-deterministically, you need deterministic guardrails. Vault policies for agents combine identity, path-based access, and runtime conditions.
- Create a new policy (e.g.,
agent-policy) in Vault using the standard HCL format. - In the policy, reference the agent’s identity via
identity.entity.agent_idor a group membership. - Specify allowed paths (e.g.,
secret/data/production/*) and capabilities (read,list). - Add runtime conditions—for example, limit access to specific times, IP ranges, or actions.
- Bind the policy to the agent or an agent group. Agents inherit policies via identity.
Example Policy Snippet
path "secret/data/production/{{identity.entity.agent_id}}/*" {
  capabilities = ["read", "list"]
  condition {
    source_ip = "10.0.0.0/8"
  }
}
Step 3: Enable Per-Request Ephemeral Authorization
Ephemeral authorization grants temporary rights that expire after a task or timeframe, reducing risk from long-lived credentials.
- In your agent policy, add a
ttlormax_ttlparameter to any secret or token generation. - Configure Vault to issue credentials (e.g., dynamic secrets) with short lifetimes—seconds to minutes.
- For direct secret access, use the
ephemeralflag in your API call to request a one-time token. - Set up renewal policies only if strictly necessary; otherwise, force re-authentication per request.
This ensures that even if an agent is compromised, the blast radius is limited to the current request.
Step 4: Implement Delegation and Consent (OBO)
Agents often act on behalf of a human user. Vault supports on-behalf-of (OBO) delegation with explicit consent tracking.
- Register the agent and the human user in the agent registry (as described in Step 1).
- Configure a delegation flow: the user grants consent via Vault’s consent endpoint or OAuth integration.
- In policies, include
delegatorconditions to restrict agent actions to only those consented by the user. - Audit logs will record both the agent and the delegating user for every action.
Best Practice
Use a short expiration for delegation tokens (e.g., 1 hour) and require re-consent for each new task.
Step 5: Enable Auditing and Observability
Clear attribution is critical. Vault’s audit logs now include agent IDs and delegation context.
- Enable audit logging (if not already) via
vault audit enable fileor syslog. - Verify that logs show
agent_id,delegator, andrequest_idfields. - Set up monitoring alerts for unusual agent activity (e.g., high rate of denied requests).
- Integrate with your SIEM for centralized visibility.
Step 6: Test and Iterate
Before going live, simulate agent behavior with controlled test agents.
- Create a test agent in the registry with limited permissions.
- Run typical workflows (e.g., secret retrieval, credential rotation) and verify policy enforcement.
- Check audit logs for correct attribution.
- Adjust policies and ephemeral TTLs based on test results.
- Roll out incrementally to production agents.
Tips for Success
- Start with a non-critical agent to validate your policies.
- Use groups in the agent registry to manage agents with similar roles.
- Regularly review audit logs for anomalous delegation patterns.
- Combine ephemeral authorization with token renewal throttling to prevent abuse.
- Stay up to date with Vault beta releases for improvements to agentic identity features.
By following these steps, you can securely integrate autonomous AI agents into your infrastructure while maintaining least-privilege access and full auditability. HashiCorp Vault’s new capabilities provide the guardrails needed for non-deterministic agentic workflows.
Related Articles
- 7 Key Details About The Rings of Power Season 3 Release Date
- Wendy's Accelerates Store Closures: Over 200 Locations Shuttered as Turnaround Plan Takes Hold
- The Never-Ending Saga of FISA Section 702: What You Need to Know
- Kotlin Multiplatform Project Structure: New Default and Migration Guide
- Decades-Old Roguelike Games Refuse to Die as Dedicated Communities Keep Them Evolving
- Dan Bongino's Podcast Promotion Strategy: The Power of Clippers
- 10 Crucial Insights into OpenAI's Codex Chrome Extension for Browser Automation
- From Berlin Side Project to $5.2 Billion: How n8n Became the Core of SAP's AI Platform